
Digital Photography Basics: learn how to build a digital SLR system
by Philip Greenspun; created June 1997 and revised August 2018
Site Home : Photography : Digital SLR System
by Philip Greenspun; created June 1997 and revised August 2018
Site Home : Photography : Digital SLR System
Digital single-lens reflex (SLR) cameras are the standard tool for serious photographers. With the introduction of $500 cameras from Nikon (D3400) and Canon (EOS Rebel), the market for digital SLR cameras has expanded tremendously. A point-and-shoot compact digital camera can offer reasonably good image quality, but a digital SLR, which usually looks a lot like an old standard 35mm film camera and may use the same lenses, offers the following advantages:

With the digital SLR you have a good idea of what you're going to capture by looking through the viewfinder. When you press the shutter release the camera captures the image immediately. If you need to zoom or focus manually there are large rings that you can operate quickly by feel. If you see a beautifully-lit scene you can capture that beauty instead of using an on-camera flash to blast everything with harsh white light. If you need to make a specialized photo, you can buy or rent a specialized lens and attach it to the camera.
This article explains the different kinds of digital SLR cameras available, how to choose the right one for you, and what to do once you get it home from the shop. A digital SLR camera system, complete with lenses and accessories, can cost anywhere from $500 to $10,000. This article shows you how to choose and buy the basic items first and the more expensive and hard-to-use components later.
The single lens reflex (SLR) is most folks' idea of a serious camera. "SLR" means that the same lens is used for viewing and taking pictures. A mirror in the body directs the light from the lens up into a prism for viewing, then flips up out of the way just before an exposure is made. The standard photojournalist's Nikon from the 1960s or 1970s was an SLR with a roll of 35mm film behind the mirror. When the mirror came up the light passed through to the shutter, which opened to expose one frame of film for perhaps 1/60th of a second. A Canon Digital Rebel or Nikon D80 looks very similar and works in almost the same way. The only difference is that instead of a piece of film behind the shutter there is an electronic sensor.
The mirror and optical viewfinder are what enable a photographer to frame images more quickly and accurately than with a point-and-shoot camera. Regardless of what lens or filters you have attached to the camera you see what the sensor will see. The same can be said for the LCD displays on the back of a $200 point-and-shoot camera but those displays are difficult to interpret in sunlight. The typical digital SLR camera viewfinder offers additional information underneath the image, including all the most important camera settings.
The SLR is much larger and heavier than the point-and-shoot camera. If you are leaving the house to socialize and want a camera to keep in your pocket just in case an interesting photo presents itself, the SLR will seem cumbersome. If you are heading out specifically with a photographic project in mind you will appreciate how the SLR and its controls fit into your hands.
Because digital SLRs are more expensive than point-and-shoot cameras the manufacturers typically put in faster computers and better autofocus systems. This makes the cameras more responsive and you are more likely to catch the "decisive moment" as the baby's face lights up with a smile, the soccer ball leaves the player's foot, or the dog catches the frisbee.
A digital SLR may offer the same number of megapixels, individual image elements, as a high-end point-and-shoot. Not all pixels are created equal, however. Resolution is important if you intend to make large prints but dynamic range, the ability to capture detail within bright highlights and dark shadows, is more critical in many situations. The sensors in digital SLRs are typically much larger than those found in point-and-shoot cameras. The main advantage of a larger sensor is better performance in dim light. If there are 8 megapixels spread out over a sensor that is 4 times larger than the sensor in a point-and-shoot camera that means more photons of light will fall on any given pixel. If during an exposure 50 photons would fall on the small sensor then 200 photons would fall on the big sensor. If there is a small change in the light from one part of the scene to another the sensor in the point and shoot camera is trying to notice a single extra photon; the electronics in the camera with the big sensor have four extra photons that are much easier to detect.
First-time consumers of digital SLR cameras focus on the body. Long-time photographers, however, look at the system. An SLR system includes a body, multiple lenses, flash units, and various connecting cords. For most photographers the investment in lenses will come to dwarf the cost of a body. It is thus important to choose a system whose manufacturer makes the lenses that you need for all of your potential projects and, ideally, whose system is popular enough that you can rent special-purpose lenses for uncommon situations. Each camera system has its own lens mount design and a lens that works on, say, a Nikon camera cannot be attached to a Canon body.
If you don't need an optical viewfinder then you don't need a mirror and all of the mechanics associated with flipping it up and down. The "mirrorless" camera body is a box in which light from the lens can go to the sensor all of the time and image previews are shown on a rear screen or, optionally, in a small electronic viewfinder.
A traditional advantage of the DSLR is that the mirror can send light to dedicated autofocus sensors that are faster at focusing and better at tracking fast-moving subjects, e.g., for sports and action photography. The latest mirrorless systems, however, have sensors that are augmented for use in the autofocus system and perform quite well. The principal advantage of having the full-resolution sensor be the autofocus system is that intelligent software can find the subject's eyes and use those as the focus point.
Mirrorless systems tend to be lighter and more compact than DSLRs, which are in turn able to handle more abuse.
Running the rear display consumes a lot of power and therefore real-world battery life is much better with DSLRs.
All current DSLRs can operate in a "mirror-up" mode and do most of the things that the mirrorless systems do. Thus, if you're willing to sacrifice weight and compactness, the DSLR is a more versatile tool.
The DSLR looks like a more serious tool, though in reality even an inexpensive Sony mirrorless system will create better images than the most expensive current Canon bodies.
My personal favorite system for family photography is the Sony APS-C mirrorless system, though unfortunately the lens choices are limited. Folks who prefer a more subdued color palette will want to investigate the competitive Fuji mirrorless system, also APS-C. The highest quality mirrorless system is the Sony full-frame mirrorless system, whose sensors are similar to those in the top-end Nikon DSLRs.
A more important question to ask is "Who makes digital SLR sensors?" Sony is the leader in quality and volume. Canon makes its own sensors. Samsung, Toshiba, and a handful of other chip makers also product sensors.
The same companies that made 35mm film SLRs make digital SLRs. Nikon continues to make bodies, though it purchases state-of-the-art sensors from Sony. Canon continues to make bodies and fills them with their own inferior quality sensors. Most photographers who had a lot of Canon or Nikon lenses from their days as a film photographer will have a digital body from the same company.
For about 15 years, the market leader in the professional/advanced amateur photography world was Canon. Leadership passed to Nikon as Canon fell behind in the critical area of sensor dynamic range, the ability of a camera to capture detail in dark and light portions of the image simultaneously. The long-term leader may end up being Sony, which concentrates on a "mirrorless" system.
Olympus and partners created the innovative compact Four-Thirds system, discussed below.
There are three kinds of digital SLR systems being made as of August 2018:
We will discuss each in turn.
Big lenses, big sensor. Canon and Kodak took the most obvious approach to the challenge of transitioning from film to digital: build a digital sensor exactly the same size as one frame of 35mm film. The result is a chunk of silicon 24x36mm in size, which is vast compared to the sensor in a point-and-shoot digicam. The benefit of this vast sensor is reduced noise, which looks like grain, in low light/high-ISO situations. The drawback of a vast sensor is that manufacturing a flawless piece of silicon this big is expensive.
Kodak was a pioneer in this area with its DCS Pro SLR/n and SLR/c bodies. Canon kicked off the mainstream market in 2005 with the EOS 5D.
Big lenses, small sensor. In order to keep the cost of the body within a range of $700-1500 and allow photographers to use their old 35mm system lenses most digital SLRs fall into this category. The front of the body has the same lens mount as an old film SLR. The back of the body has a sensor that is smaller than the 24x36mm standard frame of an old film SLR. The result is a camera that looks the same as the old film camera but multiplies the magnification of all the lenses. Having a smaller sensor is like cutting the center out of a drugstore proof print, hence the term "crop-sensor DSLR". You don't capture all the information on the left and right and top and bottom of the frame. It is as though you took the picture with a telephoto lens. The viewfinder has been adjusted so that what you see optically is what is captured in the digital file. If you're coming from the film world you will need to do a mental adjustment. A 50mm normal perspective lens on a big lens/small sensor camera behaves like an 80mm telephoto lens on a film camera. A 20mm ultra wide-angle lens behaves like a 30-32mm slightly wide angle lens on a film camera.
Small lenses, small sensor. The biggest problem with the "big lens, small sensor" situation is that photographers are forced to cart around lenses that are much larger, heavier, and, theoretically, more expensive, than they need to be. A big and heavy telephoto lens is big and heavy mostly because it is built to cast an image circle large enough to cover a 24x36mm frame. Yet it may be used on an APS-C Canon Rebel camera whose sensor is only 15x22mm in size. Any engineer would look at this "big lens, small sensor" situation and say "Why not come up with a standard reasonable sensor size and then make lenses that are just large enough to cover that sensor with an image?" That's precisely what the Four Thirds consortium did. Olympus and Kodak seem to have been the originators of the standard but Fuji, Panasonic, Sanyo, and Sigma signed on as well according to www.four-thirds.org. This seemed like a great idea at the time (2002) but only Olympus and Panasonic were serious about this sensor size and APS-C mirrorless systems from Sony and Fuji are the true heirs of the idea.
Lenses are specified by focal length in millimeters and aperture, a ratio between the diameter of the lens and its length. The longer the lens, the greater the magnification. A 50mm lens gives approximately the same perspective as normal human vision. A 400mm lens gives a view like looking through 8X binoculars and a 20mm lens is a dramatically wide angle lens. Lens apertures or f-stops have the following full steps: 1.4, 2.0, 2.8, 4, 5.6, 8, 11, 16, 22. Each step represents half as much light being admitted to the sensor. "50/1.4" is shorthand for a lens that is 50mm long and has a maximum aperture of f/1.4. Zoom lenses are specified with the focal length range followed by the aperture range, e.g., "24-105/2.8-4" is a lens that goes from a wide 24mm perspective to a telephoto 105mm perspective while the maximum aperture available goes from f/2.8 at the 24mm end to f/4.0 at the 105mm end. A "fast" lens is one with a wide maximum aperture, e.g., f/2.0. A "slow" lens is one with a physically small (though numerically large) maximum aperture, e.g., f/5.6. The slow lens will require a more brightly lit scene in order to deliver adequate illumination to the sensor.
You've bought, or rented, a digital camera.
It is rather unsatisfying to fool around with a camera unless you can form images on the sensor and therefore you need a lens. The cheap zoom lenses that come packaged with a low-end Canon or Nikon DSLR are poor tools for building photography skills or making compelling images. The novice photographer who starts with a zoom lens typically uses it in lieu of backing up or stepping forward. An experienced photographer visualizes the scene first, chooses a focal length, then gets into the appropriate position to capture the scene with that focal length. It is much better to get a lens with a fixed focal length, learn to recognize scenes where that lens can be used effectively, and then add additional lenses once that focal length has been mastered. So even if you have the $1000+ to buy a high quality zoom and the muscles to lug it around it is probably a poor choice of first lens.
The $100-200 lightweight zoom lenses that come bundled with digital SLR bodies have some additional limitations. Being a good photographer starts with the ability to recognize a scene that looks attractive under its current lighting conditions. You need a lens with a wide enough maximum aperture, typically f/2.0 or f/1.4, to capture that scene even when the lighting is fairly dim, as it will be indoors or near the end of the day. An inexpensive zoom lenses will have a maximum aperture of between f/4.0 and f/5.6. At an aperture of f/5.6 you will need 8 times as much light to take a picture as you do at an aperture of f/2.0. Thus the cheap zoom will force you to use the on-camera flash, which casts an ugly flat light and in any case will render the scene completely different than it looked to your naked eye. Flash can be useful, especially with multiple strobes in the studio or as a fill-in light to reduce contrast outdoors, but mastering flash photography is a separate challenge.
The final problem with a cheap zoom lens is image quality. There is no free lunch in this world and when an optical engineer cuts cost and weight the sharpness and contrast are reduced. In fact, you might get a better quality photo with a point-and-shoot digicam than with a heavy expensive digital SLR with a cheap light zoom lens attached.
My recommendation for a starter digital camera lens is a high-quality "prime" lens with a fixed focal length. You want a "normal" perspective so that the relative sizes of objects in the image will be roughly what you experience with your normal vision. For a 35mm film camera or a full-frame digital SLR, the normal focal length is 50mm. For a Canon EOS Rebel or similar APS-C "big lenses/small sensor" camera the normal perspective is afforded by a 30-35mm lens. For a Four Thirds camera such as Olympus bodies, the normal lens is 25mm.
The cheaper 50/1.8 lenses can actually outperform the more expensive 50/1.4 lenses, so don't splurge on the 50/1.4 unless you're planning to do most of your work in dark conditions (where the 50/1.4 will give you a brighter viewfinder). Note than the older Canon and Nikon 50/1.8 lenses lack ultrasonic-style autofocus motors and are therefore slow to focus and make it tough to use a combination of auto and manual focus.
For the Canon small sensor DSLRs, there is no true "normal" lens that is inexpensive. Canon makes an "EF-S" 24mm lens (slightly wide) and a 40/2.8 full-frame "pancake" lens, but no purpose-built normal-perspective prime lens to cover the APS-C sensor. Sigma makes a high quality 30/1.4, which is much lighter than Canon's full-frame 35/1.4L and less than half the price, but that still means a $500 lens.
Nikon treats its crop-sensor customers much more seriously and provides a 35/1.8G AF-S lens for about $200.
There are a variety of 25mm prime lens choices for the Four Thirds and "Micro Four Thirds" mirrorless cameras. These include Panasonic, Panasonic-Leica, and Olympus.
The biggest digital SLR cameras take not-so-very-compact Compact Flash (CF) memory cards or their successor: "XQD." These are sold separately from the camera body. Consumer-oriented DSLRs will have only an SD card slot. If you want to capture video make sure that you get a card with a high maximum writing speed (the camera's manual will tell you the fastest standard that the card can use). The camera has a memory buffer allowing you to capture 20 or more images in rapid sequence, and then it writes them to disk as fast as the card allows. Even with a large buffer, however, you want a fast card so that the camera is responsive to requests to review recently captured images.
A "UV haze" filter, appropriately sized to fit the front of your lens, can be useful if you're taking pictures in a dusty or wet environment or if you're lending your camera to a careless person. For maximum contrast and image quality, however, don't leave the filter on the lens when doing a project in a clean environment.
As far as cleaning accessories go, the most useful is a microfiber cloth. Remember to drip the cleaning fluid onto the cloth and then wipe the lens; do not drip cleaning fluid directly onto a lens. Also never try to clean an SLR mirror yourself. Dust on the mirror will not appear on your images and it is very easy to damage the mirror surface. Zeiss makes some good lens cleaning products, including their pre-moistened wipes.
In the old days you saved a lot of money by buying camera equipment from one of the big New York City retailers, e.g., B&H Photo or Adorama. These days, however, prices for digital cameras are about the same all over the country (the miracle of price-fixing by the manufacturers!). The main problem with buying digital SLR cameras and digital camera lenses at a non-specialty store is that they won't have the serious lenses. You'll be able to get the cheap popular zooms but not the prime lenses, the professional-quality zooms, or unusual accessories.
Please take a moment to read this article on photographic light (written for the film era but still valuable). Read the owner's manual that came with your camera a couple of times.

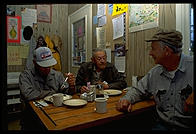
Set the camera to ISO 400 or ISO 800 and learn to make satisfactory images with available light indoors. Since you will usually find people indoors, you might as well include them in your pictures. The normal perspective lens is wide enough to show a person plus some part of the activity in which he or she is engaged.
If you got your digital SLR camera as a kit with a cheap zoom lens this would be a good time to compare the utility of the slow zoom lens with the fast prime lens. Try the same portraits indoors with the kit lens and the 35/1.4 or 50/1.4 lens. See if the small maximum aperture of the kit lens forces you to use either very slow shutter speeds (blurry due to camera shake) or very high ISO speeds (lots of digital noise in the images when viewed later on a computer screen).
On the computer side, you need to come up with a plan for storing and selecting photos. My personal strategy is to start with directories named YYYYMMDD-subject, e.g., "20050813-newport-jazz-festival". Prefixing with the date in that format ensures that the directories, sorted by name, will appear in chronological order. The really bad photos I move into a subfolder called "rejects". The better photos I rename to something more descriptive than the camera-generated serial number. All of this can be done within the Windows file explorer, even for camera RAW images (Windows 10 automatically downloads "camera codecs" and more can be added). Macintosh OS X also provides support for viewing RAW images.
Google purchased Picasa, a wonderfully efficient desktop-based photo organizer/editor with tight synchronization to online libraries. It worked with RAW files. It covered 95 percent of what a typical photographer might want to do with Adobe Photoshop with just a handful of features and menus and was therefore much faster to operate. Google desupported it in 2016, however, and then, despite millions of people still running Picasa on their desktops, broke Picasa's link with the online world in 2018. Google failed to open-source this software and therefore there is no way for programmers to keep it up to date with operating system changes and new online photo-sharing systems.
Adobe Lightroom seems to be the best current choice for organizing and editing.
Set the camera to ISO 50 or 100 (the lowest numerical setting, which will be the highest quality) and walk around on sunny days looking for interesting shadows. Photograph the shadows either by themselves or in conjunction with the objects casting the shadows. One of the goals here is to train your eye to look for interesting shadows.
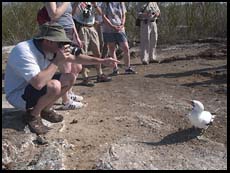
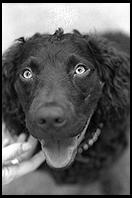
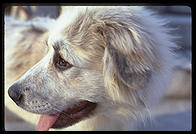
Set the camera to ISO 400 and walk around on an overcast day looking for interesting pictures that you can take with the camera no more than one or two feet off the ground. People tend to make nearly all of their photographs while standing erect. It is good to train yourself to experiment with crouching or even lying down to get a different perspective.
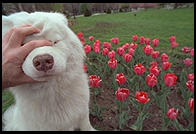
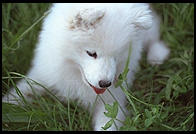
When photographing dogs and children, it is particularly important to consider the effect you'll have on the picture by standing over your subject.
Many interesting pictures require keeping the shutter open for several seconds, much longer than human beings are capable of holding still. A tripod will enable you to fix the camera in a compositionally satisfying position and take 30 second or longer exposures.
Read this tripod primer and buy whatever fits your budget. Rest assured that as you get serious, you'll probably end up with another tripod or two.
Some good tripod choices for typical digital SLRs:
More expensive tripods are either lighter or provide better dampening of vibration or both.

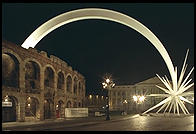
Drive to the nearest city with interesting buildings that are illuminated at night. Set the camera to ISO 100 (the relatively slow speed is irrelevant now that you have the tripod) and bracket your exposures. In addition to learning about low-light metering and the use of the tripod, you want to see the aesthetic effect of differing exposures. There really isn't a correct exposure for night photography. Do you want the building to look sort of dark and mysterious? Bright and inviting? It is your choice with a flip of the shutter speed dial. Note that none of your slides will record the full range of tones in the original scene. Some parts of the building that you could see with your eyes will register on film as pure black. Some parts that are close to street lights will be blown out into pure white.
You should be comfortable with the normal lens now and have a pretty good idea of when you can successfully use it. The uninteresting and obvious thing that a wide-angle lens does is capture more of the surrounding scenery on film (something that you could achieve with the normal lens, simply by backing up). The non-obvious thing that a wide-angle lens does is change the relative prominence of objects in a scene (see the image at left, which was taken with a 14mm extreme wide-angle lens on a 35mm film camera).
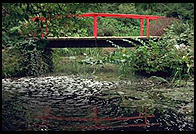
As a growing photographer, whenever you're using a wide-angle lens, you have to learn to look for interesting objects to fill the foreground. If you don't find one, you'll end with a flat postcard-like image. If you do find an interesting object, move in close so that it fills at least one-third of the frame. The interesting thing about the resulting image is that your viewers will get a good look at the object you've selected but will also see a wide swath of background.
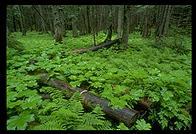
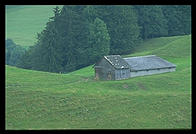
In the image at right, note how the foreground log and ferns are the main subject but you can still see a lot of the background forest. This was taken with a 20mm lens on a film camera (and a tripod, in the rain, with a towel over the lens, exposure for almost 1 second).
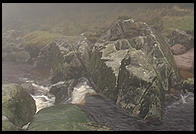
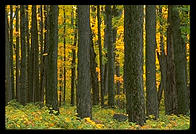
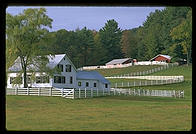
For comparison, below right is an image that was not taken with a wide-angle lens. In fact, it was made with a telephoto (narrow-angle or high-magnification) lens, about 200mm long on a film camera. Note that foreground and backgrounds trees all have roughly the same relative prominence. That's because the foreground trees aren't much closer, percentage-wise, to the camera than the background trees.
How wide a lens to get? Technically 35mm on a 35mm camera is wide but it is the same focal length as most point and shoot cameras so I don't recommend it. If you're going to lug an SLR around you want something at least a little bit dramatic. I recommend starting with a lens that is gives a 24 or 28mm perspective on a film or full-frame digital camera, which means a 16-18mm lens on a mid-range Canon EOS or Nikon crop-sensor digital SLR. After you've made a lot of images with which you're happy (i.e., where you successfully found a good object for the foreground), then consider widening out to 16 or 20mm, which translates to 10-14mm on a "big lenses/small sensor" digital SLR.
In practice it is difficult to find reasonably priced ultra-wide prime (non-zoom) lenses. There isn't a very large market for a 14/2.8 lens and therefore they are built almost by hand. It therefore makes sense to buy a wide-angle zoom lens.

The most common example uses for wide-angle lenses are all dramatic landscapes. I don't like this for learners, though, because (a) it is time-consuming for most people to have to drive to a dramatic landscape, (b) photojournalists make frequent and brilliant use of wide-angle lenses to illustrate people interacting with each other or with their environment.
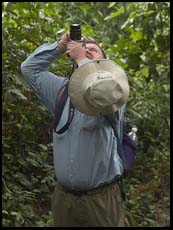
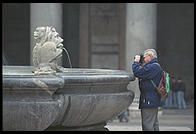
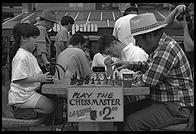
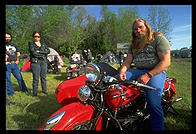
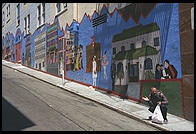
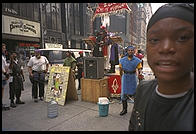
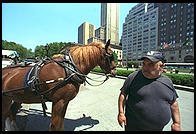
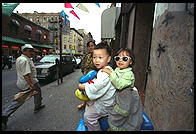
So get out there with your new wide-angle lens and get up close to your subjects. You need to learn how to stick a camera 12 inches from your subject. Remember that the ruder your personality, the better a photojournalist you will make. Here are a few examples to motivate you.


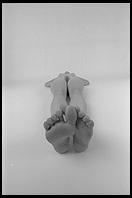
With the wide lens, you've explored the possibilities in showing a subject plus its environment. With the telephoto lens, you must learn to find good compositions where you isolate your subject from its environment. Telephoto lenses accomplish this isolation first by having higher magnification than a normal perspective lens. So without you having to move forward, the lens will record a smaller portion of the scene on film. The telephoto lens compresses perspective. As in the tree image above, foreground and background objects won't be given dramatically different prominence. However, if you don't stop the lens aperture down, background objects may be so out of focus as to be imperceivable by the viewer. With the image at right, taken with a 300/2.8, the viewer's eye is immediately led to the subject because everything else is out of focus.
Note that depth of field, or what is in and out of focus in the scene, is a function of the absolute length of the lens and the aperture used for exposure. Thus to get this kind of background blur with a mid-range digital SLR you would still need to use a 300/2.8 lens even though the same magnification and subject scale could be achieved with a 200mm lens.
It is probably worth buying a prime telephoto lens equivalent to 100-150mm on a film or full-frame digital SLR. This is short enough to be cheap and long enough to be noticeably different from your normal lens. Note that 100mm was typically considered the ideal lens for portrait photography on a 35mm SLR. If you must have a zoom telephoto, restrict yourself to the Canon L-series and similarly priced competitors. An 85/1.8 lens would be a good starting point for a crop sensor DSLR.
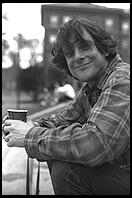
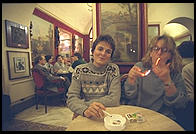
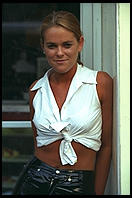
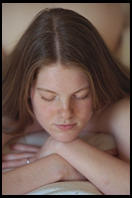
Park your subject near a window, traditionally north-facing, that provides indirect sunlight. Get a piece of white cardboard to reflect light back from the window onto the side of your subject facing away from the window. Put your camera on the tripod. Take pictures. When you're done, you'll be a "window-light portrait" expert. Here's some inspiration (only one of these was taken by window light).


You now have enough stuff for your first camera bag. Read this camera bags primer. Ideally, go to a good camera shop and see which bag comfortably holds all the stuff you've got plus maybe one more small item. Don't get a bag that is too big. Even as your system expands, you'll still want a bag that is just right for a body plus three lenses.
You've now got a comprehensive digital SLR camera system. Stop buying stuff. At this point, you need only buy or rent stuff in the context of trying to realize a particular photographic project. Remember that no matter how much equipment you lug around you will never have the right lens for every picture at every moment. One needs to accept that some great photos will slip by without being captured.
If you feel that you have to buy something new, here are some good project-based excuses.
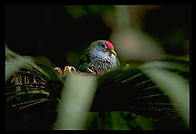
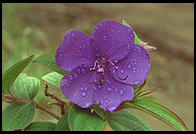
If you want to explore the world up close (real close) then you need a macro lens. Read my macro photography primer and get a lens that suits your desired working distance from the subject. Then head out into a flower garden with your tripod. An overcast day is probably best. Below is some inspiration from my Hawaiian flowers exhibit and my page on Joshua Tree National Park.


Some good macro lenses for digital cameras:

If you care about quality, zoom lenses are heavier, more expensive, and never quite as sharp or contrasty as fixed ("prime") lenses.
If you're rich and lazy, you can get professional zoom lenses simply to avoid having to change lenses. The cost is $1000-2000 per lens and the quality loss is small. If you're poor and quality-conscious, you're much better off sticking to prime lenses.
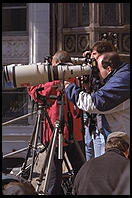
When does a zoom lens help you accomplish a photographic objective? Event photography. The one constant of photojournalism is that your subjects probably won't wait around for you to set up a tripod or change lenses. It helps to be fleet of foot and unencumbered by a huge camera bag full of lenses. It helps to be ready with the right focal length lens on your camera instantly.
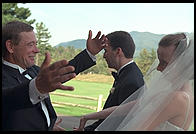
If you're going to take pictures at your cousin Shlomo's wedding, that's a good excuse to buy a zoom lens covering 24-85mm (full-frame digital SLR or film perspective) or so. If the official wedding photographer is delivering images in color, you can impress Shlomo and the rest of your family by delivering all of your images knocked down to black and white. Unless your family is very chic, their mutual color coordination will probably be ineffective. They'll look better in black and white and remember that you'll be free to take pictures using incandescent and fluorescent light sources without worrying about adjusting the white balance.
Text and photos Copyright 1995-2018 Philip Greenspun.