Collage
by Philip Greenspun; created March 2008 and revised August 2018
Site Home : Photography : Collage
by Philip Greenspun; created March 2008 and revised August 2018
Site Home : Photography : Collage
Straight photography has always been inferior to oil painting in its ability to "hold a wall". Enlarge even the best 35mm negative or digital SLR RAW file to the width of a living room sofa and you don't have to stand very close to notice softness and lack of contrast. Nobody ever approached a grand Rubens painting and said "It is getting fuzzy and uninteresting as I look closer."
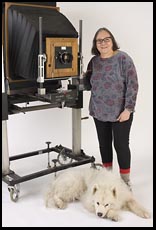
One of the best lenses in the Canon EOS
system is the 50/1.4, a simple design that does not demand a
lot from the lens designer. The image below (of Elsa Dorfman, Boston's best-known
portrait photographer), however, illustrates what the actual pixels
from the 21MP sensor of an
| Original | 100 percent crop |
|---|---|
|

|
How large would you have to blow the image up before someone would begin to see these lens quality limitations? A typical viewing distance is 12 inches. The 100-percent crop is about 320 pixels in size and probably shows up on your computer monitor at just over 3 inches in width. Let's say that an image from the 1Ds Mark III would have to be enlarged to 72 pixels per inch to look truly crummy when viewed up close. The Canon SLR puts out an image 5616x3744 pixels in size. At 72 pixels per inch, that would be 78" wide.
Could things start to look crummy in smaller enlargements? Sure. This image was taken with one of Canon's best lenses using studio strobes, which freeze camera shake and subject movement. Had we used a cheap zoom lens or handheld the camera at 1/60th of a second we would probably get disappointed sooner.
Could we get better results from a single image? Probably. In the old film days, guys such as Andreas Gursky used 5x7" view cameras and 6x17cm roll-film cameras (example: Fuji 617), plunked down on heavy tripods, and printed up to ten feet in width. They quickly discovered that enlargers and enlarger lenses weren't that great either.
This first gifts of the digital revolution for photographers who wish to compete with painters were the drum scanner and line-at-a-time digital printing systems. After exposure, the image never went through another lens. The film was scanned one line at a time by the drum scanner. The print, made as a wide roll of paper fed through an LED or laser-based printer, was exposed one line at a time as well. The corners and edges of the print could be as sharp as the center, assuming the original image was of high quality from corner-to-corner.
Some of the more interesting prints to come out of this first wave were photo mosaics, notably those by Robert Silvers.
Starting in the early 2000s, physically large and very high resolution CCD and CMOS sensors became available. Canon produced 24x36mm sensors to sit behind standard 35mm lenses. Specialized studio photography companies produced sensors up to 36x48mm in size to sit behind medium format and view camera lenses. As of 2008, easy-to-buy examples of these image systems include the Canon 1Ds Mark III (21 MP, just under $10,000), the Mamiya 645ZD (21 MP, just under $10,000), and the Hasselblad H3D (39 MP, over $30,000). These are discussed in the "Digital Cameras" chapter of Making Photographs).
With a tripod and/or studio strobe system, could you use one of these systems to create a single image that would look great when enlarged to six or eight feet in length? Probably. What if sensor fabrication improved to the point that 60x60mm sensors become available, full frame on an old square-format Hasselblad or Rollei, and requiring less physical enlargement to get to a huge size? Almost definitely.
There are some problems with this approach. Many of the most compelling images are created in environments where it is not practical to use a tripod or a huge camera. Not everyone wants to spend $10,000+ on a camera system or lug that much weight.
Would it be possible to create a compelling 6'-wide print using a $200 camera?
The answer is "Yes, if you collage multiple images from that camera."
Thanks to improvements in technology, you no longer need to spend big $$ on high quality scissors and as much as $100 on the Adhesive Transfer Gun. Only the following items are required to make a 100-percent digital photo collage with high individual image quality:
An advantage of the all-digital approach is that it is possible to rethink and reposition collage elements. A significant disadvantage is that you're working at a different scale. When working with scissors and tape it doesn't take any special skill to visualize how the thing will look full-size; it is inherently full-sized. When working on a 30" LCD monitor, however, you have to imagine what the finished much larger piece will look like. Sometimes scale changes everything.
With digital SLR images, limit enlargements to no more than 200 pixels per inch, e.g., with an older 6 MP digital SLR, that's 10x15", with the 12-13 MP SLRs, that's 15x22". The medium format backs and the Canon 1Ds Mark III, if used on a tripod, should be able to cover 20x30" of the collage with excellent quality.
With point and shoot cameras, the megapixel numbers are not very meaningful. The sensor is tiny. The lens is not very good. They could deliver 100 megapixels out of the camera and it would still be unwise to attempt to cover more than 8x12" of the canvas with an image from one of these things.
The Gimp is free, open source, and fully capable of creating collages, with each photo in its own layer, very similar to the Photoshop tutorial below. Reading camera RAW files will require a plug-in (free and kept up to date for the latest cameras).
LumaPix's FotoFusion was purposely built for creating collages. The $200 "Extreme" version can supposedly handle a 20,000-pixel square file.
The best thing about FotoFusion is that it is structure-based rather than pixel-based. You work with tokens representing the full-size image, which makes placement and size adjustments instant. When you are happy with your collage, you "export to file" and specify the final image size. You can then walk away and eat dinner while the application renders an enormous file. FotoFusion can save JPEG, PNG, PDF, TIFF and Photoshop-format files. One serious limitation of FotoFusion is that it cannot work with camera RAW files. You need to convert all of your photos to JPEG (or TIFF?) before they will be readable by FotoFusion.
Adobe Photoshop is the tool that most people already have on their desks. This is the tool that the printing lab will have. Photoshop can be painful for photographers because it is really more of a graphic artist's tool. Photoshop's pixel-based rather than structure-based nature means that you are working interactive with full-size files, which will be excrutiatingly slow unless your computer has an enormous amount of RAM. Here are some arguments in favor of Photoshop:
Note that Adobe Lightroom does not offer any collaging functions.
A 400 megapixel file with three bytes per pixel (one for each color) will occupy 1.2 GB of memory. Every time you edit the image Photoshop may have to make a copy in order to provide the "undo" function. For reasonable responsiveness, you probably need a computer with at least 10 times as much memory as the file size and plenty of free hard drive space as well. When working with FotoFusion, you could probably reduce memory requirements to 5X the final image size.
Try to build a computer with a minimum of 64 GB of RAM.
Suppose that you want to print your collage in a range of sizes, from 8' wide down to 2' wide. As noted above, Adobe Photoshop is a pixel-based tool rather than a structure-based tool. You must complete your collage at the maximum size and resolution that you will ever need. For printing at smaller sizes, the lab can reduce as necessary or you could save out the file with fewer pixels. With FotoFusion, you need only go through multiple Output steps, each time specifying a different final size.
Should you choose to use The Gimp, you're probably a true computer nerd fully capable of figuring everything out for yourself.
Should you choose to use FotoFusion, you can simply follow the instructions included with the application and use their technical support services as required. FotoFusion was designed for collaging and therefore you need not sift through unrelated commands to find the relevant ones for making a collage.
Should you choose to use Photoshop, we hope that this tutorial will prove helpful. Below is a step-by-step guide to using Adobe Photoshop CS3 on Windows XP to build a collage. The commands and ideas should be transferable to future versions of the programs as well as to the Macintosh version of Photoshop.
Click left on the Start Menu, which should bring up a list of programs installed on your Windows machine. Click left on the "Adobe Photoshop CS3 icon" to start Photoshop.
Pull down File->New to bring up a dialog box. Give your new collage a name, e.g., "Summer Trip 2007 Collage". Set the width and size in inches to the final size of the print that you want, e.g., 36 inches x 24 inches (this is about as large as you'd want to go on a PC with less than 3 GB of RAM). Set the resolution to 300 pixels per inch if the lab is using standard LightJet printer or some other number that the lab suggests. Set the color profile to "Adobe RGB (1998)" unless the lab specifically instructs you otherwise. Leave the pixels square. The range of printable luminance is less than 8 bits per color and most labs would prefer an "RGB 8 bit" file to a 16-bit file.
Pull down File->Place and select an image file to open. It is best to work from the original camera RAW image and resize from there.
A "SmartObject" will show up on the canvas. Note that a new layer, named with the image file name, has show up on the Layers window at right.
Click left on the canvas outside the image and drag to rotate the image. Click on any corner of the image to resize while holding down the shift key to retain the image proportions.
Hit the Enter key to finalize the image resize and rotate.
Click left anywhere on the image and drag to reposition.
Repeat until all of the images are loaded and approximately placed.
Over in the Layers window, click right on the layer corresponding to the photo that you wish to crop. Select "Edit Content" from the menu of choices. The Camera RAW dialog box will come back up, allowing you to change exposure or crop. Once done, the changes will be applied to the already resized, rotated and placed photo on the collage canvas.
Note that cropping only produces rectangular-shaped final images.
Suppose that we want to cut a non-rectangular shape from our original photograph. Click left on the photo that you wish to edit in the Layers window. This should highlight the layer, meaning that any changes will be applied only to this layer.
Click right on the layer and select "Rasterize Layer". This kisses goodbye all of the flexibility of a Smart Object, but it enables the full range of Photoshop adjustments.
Click right on the lasso tool and select "Polygonal Lasso Tool" (the freehand lasso is too much freedom for a humble photographer). Using the Navigator window at right, zoom in on the section of the collage that you wish to work on.
Use a series of left mouse clicks to surround the part of the image that you'd like to retain. The last mouse click should be right on top of the first click so that Photoshop knows to close the polygon. You now have flash selection lines.
Pull down Select->Inverse to select everything BUT what you just surrounded with the polygon.
Pull down Edit->Clear to wipe out all the pixels in the selection within the currently selected layer (i.e., the clear command won't clear pixels in other photos).
Pull down Select->Deselect to remove the flashing selection outlines.
Click left on an image within the collage. The Layers window should show the corresponding layer.
Pull down Edit->Free Transform to get back to the size and shape transform controls that were available during the initial Place command. Remember that holding down the Shift key and dragging from a corner will preserve the image's aspect ratio.
When images overlap, an image that is higher in the Layers window will appear on top of and obscure a portion of an image that appears lower in the list of layers. Click left on a layer and drag it up or down to change whether it appears on top of or underneath another photo.
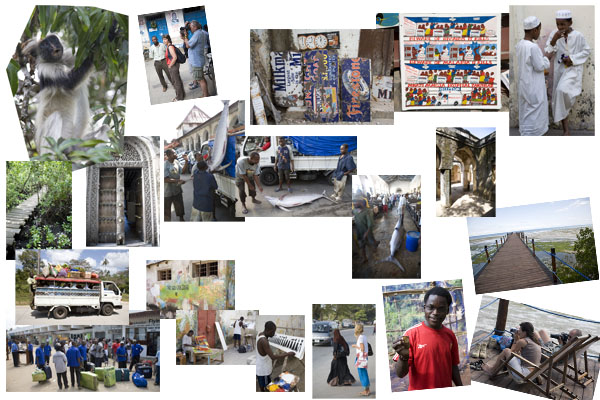
When photos overlap it may not look right because the pixels of one photo blend into those of another. Physically collaged photos will have some sort of edge. Left click on a layer, or a photo, to select it. Pull down the Layer->Style command and there are a lot of "blending options". Stroke is the simplest, adding a constant color border line around the photo. In the example below, gray borders, 7 pixels in width, have been added to some of the photos.
Click left to select a photo whose border looks good. Pull down Layer->Style->Copy Layer Style.
Click left on another photo in the college. Pull down Layer->Style->Paste Layer Style. Now this photo will have the same border.
Save your completed work in a .psd file. This preserves all of the layers and all of the flexibility of Smart Objects.
For low-budget printing services where what they want is a JPEG photo, pull down File->Save As. Select "JPEG" from the Format menu.
With The Gimp, once there is a master file open, use "File->Open as Layer" and use shift-click or control-click to select multiple photos to place into layers.
FotoFusion has an AutoCollage option. The collages that it produces look more like high school senior portrait packages than something you'd want to print and frame, but it does get a big batch of files onto the canvas quickly.
You would think that Adobe Photoshop would be able to do this with the Action recorder and its powerful batch processing tools, but I couldn't figure out how. The solution seems to be Dr. Brown's Adobe Photoshop CS3 Scripts (free), notably the Place-A-Matic. There is a link to a tutorial video on the site.
Jamie Zawinski distributes a Perl script that automatically produces collages. The results have just enough randomness in placement to look as though a human assembled them. He explains more in this Weblog posting.
For about $10,000 in hardware and software, it is possible, even for a person with limited digital postprocessing experience, to make as good a collage as an 8-year-old would make using scissors, tape, and a stack of proof prints.
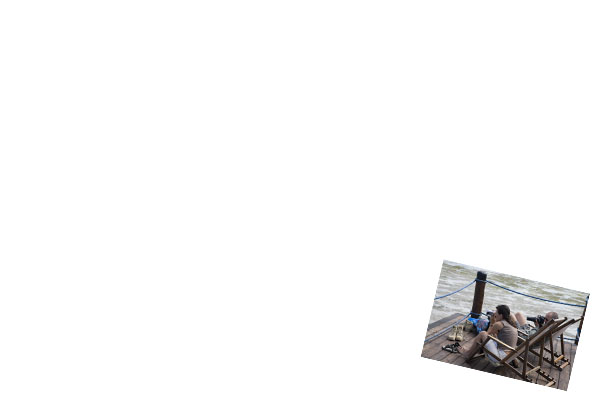
Text and pictures copyright 2007-2018 Philip Greenspun. The top image is from Istanbul. The rest of the images are from Zanzibar, off the coast of mainland Tanzania. All Zanzibar photos were taken with a Canon 5D and 24-105/4L lens.