penguin-list,
though it usually is index) and the name of the module
(in this case "Penguin Management System"). There is also a phrase which
introduces the module-name link; it defaults to "part of the" and I didn't
chose to edit it.

When we have hit the submit button on the third page, then we are offered a page showing how the list and add pages will look given the specifications one has entered. Also each listed item is a link to a demonstration edit page. Neither the add or the edit page are functional; they are just there to let us check that we like the choices we has made. If everything is satisfactory, then we may choose one of the links at the bottom of the add page to get the code to generate the pages. We are offered a choice to view the code (if we want to see whether it is what we want) or to save it in the specified directory. If we choose to save it, we are given a message at the top of the code page saying whether the save was successful, or what error was returned. If an error is returned then you may try to fix the error or change the directory, and try again. Notice that if the error is "Permission Denied" then the problem is that the the user "nsadmin" does not have write permission to that directory. Also note that the system will not save over an existing file (its safer that way) so if you want to change a file you have already saved, you need to delete the old version.
create table penguins (
        penguin_id      integer primary key,
        penguin_name    varchar(50),
        date_acquired   date,
        made_of         char(20) default 'fuzzy cloth' check (made_of in
       ('fuzzy cloth','plain cloth','wood','glass','ceramic','plastic','other')),
        -- is this a Linux penguin?
        tux_p          char(1) default 'f' check(tux_p in ('t','f')),
        description     varchar(700),
        date_entered     date,
        entered_by      references users
);

 create sequence penguin_seq
 This is a reasonable collection of data to store about a penguin
collection. Actually, I chose the columns to produce a range of types
so I could demonstrate how they all worked. I have no idea if one
would want to store anything like this about a penguin
collection. However, there are some things to note about this data
model. I have chosen an integer primary key and made an associated
sequence, since the prototype builder can build better pages (with
double-click protection and other nice features) when it has these
things.
penguin as a basefile name:
we will be returned files with names like penguin-list, penguin-add,
and so on.
After hitting the submit button, we will see...
 The first textbox asks for the title for the main page. This appears
as a main header for the first page and as a title in the others. The
next two boxes ask us to fill in phrases for the list page. when I
built this, I was hoping I would get from the user the singular and
plural form of the object that he or she is concerned about. I use
this data all over the system to fill in headings like "Edit the
singular form of object" or "View all the plural form of
object". The plural of my object is
 penguins and the
singular is penguin, so that's what I typed these in
these boxes.
The Arsdigita Community System has a sensible convention of always
including a link to the homepage of a module directly below the
main heading of any page. In order to comply with this convention,
the prototype builder asks for some phrases to allow it to
build this kind of backlink on every page. We needs to fill
in the filename of the homepage (in this case penguin-list,
though it usually is index) and the name of the module
(in this case "Penguin Management System"). There is also a phrase which
introduces the module-name link; it defaults to "part of the" and I didn't
chose to edit it.

penguin_id,
date_entered, and entered_by columns are
in this catagory; we want the user not to have access to them, so
we leave them with the "none" option selected.

For the rest of the
columns I have chosen appropriate form types. The columns,
tux_p and date_acquired, whose Oracle
datatype were boolean and date, obviously should get those form types
chosen for them.
 For the shorter text column
 penguin_name I choose
textbox, and for the longer one description I choose textarea.
This leaves made_of, which, since it consists of a list
of values amoung which the user should select, should be either a
radiobutton or selectbox. For demonstration purposes I choose radiobutton,
though ordinarily I would probably choose selectbox.
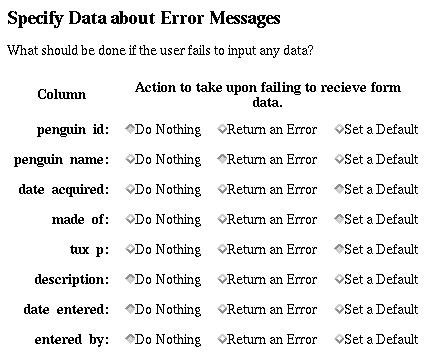
penguin_name. We must demand this column
because we chose it earlier in the 'special columns' section as the
name of the object, and thus it will be used on the list page to
identify the object to the user. The user would not wish to see an
empty string in that listing. There are some other columns for which
I decided to set defaults, mostly for demonstration purposes. I could
imagine, for instance, that a large part of the penguin collection was
aquired at a certain date (a wedding shower?) and thus the user would
wish that date as the default acquisition date. One could also
imagine that most of the penguins are made of a certain kind of
material; perhaps most of them are plush fuzzy dolls, and thus we wish
to set "fuzzy cloth" as the default material. One could also imagine
that the Tux dolls are in the minority, and thus one would wish a default
of 'false' for tux_p
Again, it is important to note that we do not need to set an error
action for every column. In fact, there are columns for which one
should not. Columns for which one did not choose a form
probably should not get an error action. Special columns like the
primary key, creation date and creation user in particular should be
left alone for the program to handle. Also there are columns like the
description column which are not important enough to
harass the user about filling, and for which a null value in the
database is perfectly acceptible.
We have reached the bottom of the second page. After hitting the submit button, one will see...
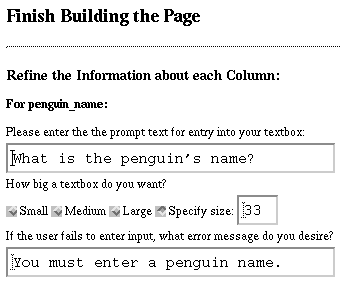
penguin_name.
Since we chose textbox as the form type, we are asked
questions specific to textboxes. We are asked to enter
some prompt text to introduce the textbox, and we are
asked to choose how large we want it to be. Usually
it is best to choose one of Small, Medium or Large, so
that textboxes will be standard sizes throughout the
application. However, in this case I wanted to make my textbox
extra small to fit in the margins of this document, so
I chose to specify a custom size. Since we chose to
ask the program to complain if the user fails to enter
input, the program asks us here for an error message to
show the user. This error message will be wrapped in
the standard text from ad_return_complaint, so if
an error actually occurs the full text will be:
 We had a problem processing your entry:
You must enter a penguin name.
Please back up and resubmit your entry.
It is useful to keep this context in mind when composing
error messages.
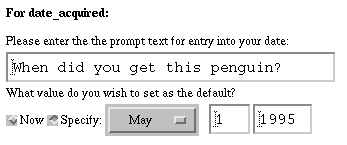
Next the third page asks us for more information about the form for
entry into date_acquired. We chose the form type to be
date, with a default value specified, and thus this page asks us for a
prompt text and a default date. I shall suppose that the magic date
which was the start of the bulk of the penguin collection was May 1,
1995, and thus I enter it here. Notice that one can also set the
default date to be "Now," which means the default will be set to be
whatever moment that the user chooses to look at the add
page. However, I should mention that if you choose to set no default,
the page will behave the same as if you had chosen this default. As it
were, "Now" is the default by default, and thus there is little point
to go out of one's way to specify it.

Furthur down the third page, we see a request for furthur information about
the form entry into made_of. We had chosen "radiobutton" for
this column, but this section would look the same if we had chosen
radiobutton, select or checkbox. We are asked for a tcl list of values
from which the program can generate radiobuttons. Notice that if
we want more than one word to belong to one radiobutton label, we
have to enclose it in quotes, following the grouping convention of
tcl lists. Then we can chose one of the entries of this list
to be specified as the default value for our radiobutton variable.
This entry will be checked by default on the add page. If this
were a checkbox instead of a radiobutton we could choose more
than one element of the list to be checked by default.

I have supposed that a large part of this penguin
collection is made up of Tux dolls, and thus the owner might want to
keep a record of whether this penguin represents the Linux mascot.
Therefore we have requested an entry into the boolean
tux_p. For a boolean one is given a choice of whether
one wishes it to be displayed Yes/No or True/False. Given the question
I chose as my prompt text, Yes/No is the right choice here. However,
when specifying the default, one should remember that booleans are
represented in the database as 't' and 'f', and choose one of these
letters as the default. (I should improve this interface; it is this
way because booleans are handled as a special case of radiobuttons.)
Since I am assuming that Tux dolls do not make up the majority of the
collection, I choose 'f', for false, as the default.
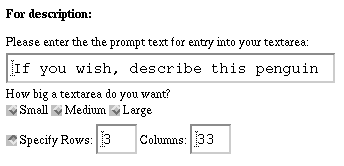
Finally, we come to the last column for which we have requested
a form entry, description. We requested a textarea
for this column. Textareas are handled very similarly to textboxes:
the only difference is that we get to choose both the rows and
columns if we choose to specify the size. Again, since I want
my textarea to fit comfortably in the margin of this document,
I choose a small width and height.
So we have come to the bottom of the third page, and
entered all the data we need to specify our prototype pages.
We hit submit and see the fruit of our labors...

However, even after adjustment there may still be some dissatisfying aspects of the formatting or functioning of the preview page which one might wish to change and cannot. For instance, one might not like the layout of the radiobuttons which list the materials (they are pretty ugly). Unfortunately, nothing on the previous pages will reconfigure this aspect of the page. This is why this is only the preview page, and the main goal of this module is not to produce a page like this, but to produce the code that generates it. One cannot hope to produce enough configuration paramaters to generate pages that would please everyone in every circumstance. However, if one offers the code for these pages, it is good enough to get reasonably close to what people want, and allow them to edit the code to get the rest of the way. So, for instance, if you want your radiobuttons grouped in threes, or sorted by descending order by wordlength, or whatever you wish to make them pretty in your eyes, by far the easiest thing is to pick up the code using the buttons at the bottom of the page, and start editing.
 Currently the buttons at the bottom of the preview page
offer links to the code to five different pages: a list page,
that will look much like the top part of the preview page; an add
page, that will look like the bottom part of the preview page;
an edit page, that will look like the bottom part but with
value from the database filled in; and insert pages for the add
and edit pages.
If you click through any of these buttons, you will see a window with the code displayed. When I designed this system, I intended for the user to be able to use the Save As... button to save the code to wherever he or she wished. In addition, I added the option to save the code directly from the web server. If you choose the "Save code" button, the system will attempt to save the code for you in the directory specified, and will leave message at the top of the code page saying whether or not the attempt was successful. If the code-saving attempt fails, it will list the error message generated by the system.
There are some standard reasons why code-saving would fail. First, if you include ".." anywhere in the name, it will fail for security reasons. Second, I decided it should refuse to save over existing code, out of a similar sense of caution. So if you hit the "Save" button twice, the save will fail the second time. You have to delete or move the generated code for the save to work again. Thirdly, unless your directory has write permission for the "nsadmin" user, you will get "Permission Denied." The best fix for this problem is to add nsadmin to your group and make your directories group-writable. However if you don't have the option to change the groups in your system, then you have to make at least one directory world-writable. I made a world-writable code/ directory and always save my code there, and then later move it to where I want it to be.
 However the code is saved, remember that it important to save it under
the filename it claims it should be. If you are desperately unhappy
with this name, you can go back and change the base filename. If even
this cannot make you happy, you can change the filename in the code,
but remember that the list page links to the edit page, and the edit
page will call the edit-2 page, and so on, so you have to be careful
to change filenames every place they appear.
Now suppose we have managed to succesfully save our code under the
appropriate names. We are ready to enjoy our working Penguin
Management System. We visit penguin-list with our browser and
see...

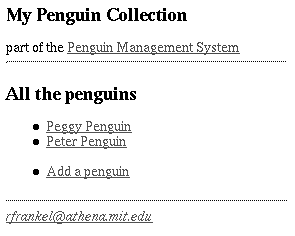
Recently some friends of mine offered to sell me some Linux stickers to stick on top of offending logos on my computer, of, well, shall we say, other vendors. Suppose these stickers feature the Linux penguin, so they count as a new addition to my penguin collection. Therefore I can use the link to "Add a penguin." to record this new addition to my collection.
At the left we see the add page that resulted when I followed the
link. I edited the code a little to improve the formatting. The
aforementioned offending radiobuttons look better now. I have filled
in the values to record my Linux sticker in the database. I assume a
sticker made of plastic counts as a plastic penguin, and I fill
in the date of April Fools Day. I also include a short description
because this is rather strange addition to a penguin collection.
After
submitting this data (where it is handled invisibly by
penguin-add-2), I return to the list page, where I see I now have a
new penguin in the database:
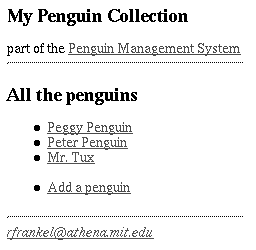
Each of the names on the list page is a link to a page where the values in the database can be edited. Thus, I can check the whether the values for "Mr. Tux" were successfully entered into the database by selecting his name. We are shown the edit page for the entry associated with "Mr.Tux" (seen below). The values seem to be the ones we entered. They are filled into forms so they could be further edited. If we want to change anything we can do so and press submit on this page to feed the change into the database.
 Variables are passed between pages using their column names. This may
cause problems if a programmer adds a call to
set_variables_after_query and it overwrites the values passed from the
forms. I am not sure what to do about this; calling the variable
anything other than their column names makes them hard to keep track
of.
Checkboxes are not appropriately filled in on the edit pages if more than one of them is checked. I used bt_mergepiece to fill them in, and I do not know why it isn't working right. In general, checkboxes are the least-well tested of the form-types, because they are rare and have strange properties. So if you use checkboxes, check your code to make sure it is doing what you want.
Another often used feature missing from this system is the ability to fill in a select, checkbox or radiobutton from values pulled from another table in the system. For instance, in my Penguin Management System, I might have had another table listing materials of which penguins might be made, and I would want the page to find this list from the database, rather than always using a pre-specified list.
Both these features would be hard to add without correcting a deeper weakness of this system. This system does not store data in the database as it builds pages, and its "data model" is entirely built out of variables passed between HTML pages. This kind of data structure has reached (or perhaps passed) the limit of the complexity it can handle. I really need to build a meta-data data model and rewrite all the pages so they rely on the data they get from the database rather than on data passed through hidden forms from page to page.
There should be a feature to enable "sort by" links on the list page. This is simple to add; however I am not quite sure how to structure the configuration of such an option.
Another major feature that might be useful, but I do not even begin to understand how to structure, would be some way to deal with objects that require permissions or approval for their creation. I do not know well enough the standard patterns for permission and approval generation to know if or how it could be incorporated into a system like this.